SafAlert Client

SECTION V. Software Setup
NOTE: Click on red text for more details on highlighted item
CONTENTS
1. Install SafAlert Client
If you haven't already installed SafAlert Client, follow the Installation Instructions.
2. Decoder Settings
Be sure radio is connected to computer as described in the Installation Instructions. To access, click the Setup button on the decoder channel you wish to modify.
2.1 Decoder settings: If you are using a single decoder channel, in most cases, these settings should not need adjustment.
Channel: - channel name as assigned on server.
RF: - radio frequency as assigned on server. This value has no effect on operation of the software.
Device - Select the desired audio input device. This must be the input that your radio's speaker output is connected to.
L/R - Select Left or Right channel audio input. Contact us at SafAlert.com if you need a splitter cable. Level meters indicate the relative audio volume of each channel. Adjust radio volume and recording level (below) as needed to prevent overload. Level should be peaking in the mid to upper range.
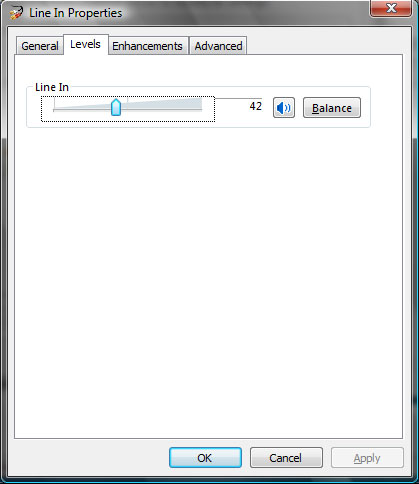
Windows Sound - Click to open Windows Recording Control Panel. Here you can adjust input volume level. See Figure 1 below.
2.2 Advanced Settings - please note the time settings (Seconds, milliSeconds [mS]) are APPROXIMATED for the sake of simplicity. This setting must be LESS than the shortest tone duration.
** WARNING: DO NOT CHANGE THESE SETTINGS unless instructed by a Support Technician! **
Decoder Squelch - Should normally be set toward the far left (-). Setting the squelch too high can prevent proper tone decoding! To adjust, watch the Decoder status indicator. Adjust squelch slider left until status shows green, then move slowly to the right until the status returns to gray. That will be the optimal setting.
Single-tone - Duration of tone that will trigger a single-tone alert (default is 4 Seconds). Most common single-tone alerts have an 8-Second duration. As a rule of thumb, the trigger setting should be about half 3/4 of the expected tone. If the long tone is 8-seconds, use a trigger of 4-6 seconds.
2-tone - Duration of each tone that will trigger a 2-tone alert (default is 500 mS) 100mS = 0.1 Second
The most common 2-tone alerting format is a 1-sec. tone followed by a 3-sec. tone. As a rule of thumb, the trigger setting should be about half of the shortest tone. If the shortest tone duration is 1-second, use a trigger of 500 milliseconds.Tolerance - Determines how close decoded frequency must be to those entered in the Tone-out List. Increase this setting if you are not sure of the correct tone frequency, or if your sound card is off-frequency.
Tone A, Tone B - After tones are received, they will be displayed here. Use this feature to identify unknown tones. This read-only box is provided as a convenience and has no affect on program operation. If you wish to discover tone frequencies for a number of departments/agencies, we recommend ComTekk's Multi Decoder.
Notch Filter - This is provided for installations where audio is tapped directly at a tone-remote control line. The default 2175 Hz is the most commonly used guard tone. Check the box to activate filtering. This will provide a 3dB band-stop filter, and the decoder will ignore this specific frequency, allowing it to decode paging tones normally. The guard tone will be effectively removed from recorded audio as well. This option should only be enabled when required in such an installation.
Noise Rejection - When enabled, rejects noise during tone decoding. If disabled, the decoder may be more susceptible to interference or falsing. The SNR (signal-to-noise ratio) is displayed at right during tone decoding.
Restore Defaults - click to restore the recommended default decoder settings.
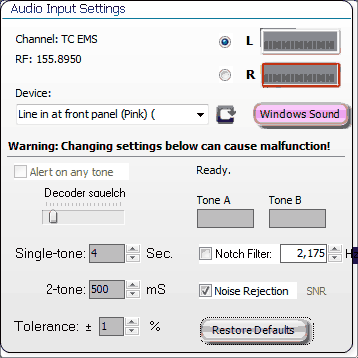
Fig. 1 Windows Recording Control Panel
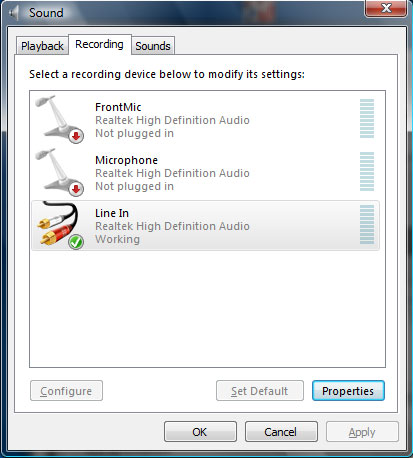
Windows recording device selection (left) and properties (right).Click once to highlight the desired input device. If more than one device is available, click the Set Default button to make it your default recording device. Click Properties, then select the Levels tab to adjust the input level of this device as mentioned above.
If no devices are listed, please plug in the audio cable to MIC or LINE jack on your computer.
NOTE: The recording input level will not affect what is heard through the computer speakers.
3. Alert Options
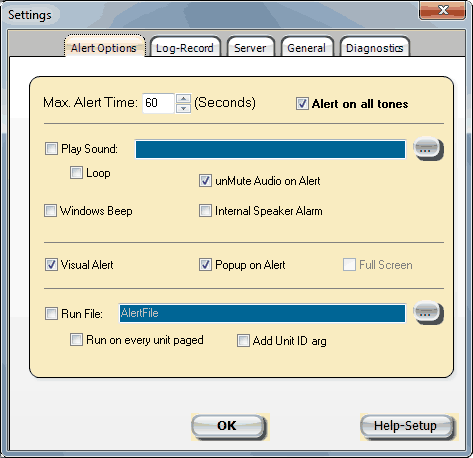
3.1 Audio/Visual alerts: Click on the Alert Options tab. These settings determine what actions will be taken when an alert is detected. Most of these items should be self-explanatory, but brief descriptions will be provided here.
Max. Alert Time - determines how long the audio/visual alerts will be active. Clicking the RESET button on the main screen will cancel the audio/visual alert.
Play Sound - plays a sound file selected by clicking the
button. The sound file selected should be .WAV type. Check the Loop box for continuous repeat.
Internal Speaker Alarm - Plays a hi/lo alarm through the computer's internal speaker if so equipped.
unMute Audio on Alert - Causes the receiver audio to play through speakers when an alert is received.
Windows Default Beep - Repeatedly plays the "Default Beep" Windows event sound.
Visual Alert - This will cause the main screen to flash red during an alert. The tray icon will also flash if program is minimized.
Popup on Alert - If SafAlert has been minimized, will restore the program window.
Run File - A powerful feature, launches any external program, script or associated file when alert is received. Click the
Run on every unit paged - When enabled, will launch the Run File every time alert tones are received. For example, if two units are paged at once, the file will be launched twice. This option should normally remain disabled (unchecked).
Add Unit ID arg - adds the Unit ID as a command line argument when Run File is launched. This option should normally remain disabled (unchecked).
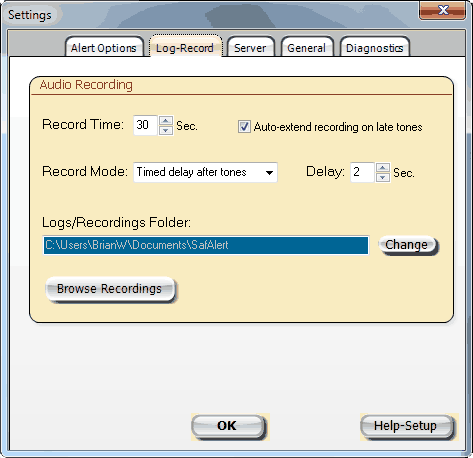
4. Log & Record Options
Controls event logging and audio recording features.
Record Time - Sets the duration of recording. The default of 30 seconds is usually long enough to capture critical dispatch information. Keep in mind, longer recordings mean larger files which take more time to send and receive. It's best to keep this time as short as possible.
Record Mode & Delay- Three modes of recording are available:
- Immediate - No delay. Recording will start immediately upon receipt of first tone-out. One or more tones may be heard in the recording.
- Timed Delay After Tones (recommended)- Recording starts after tones have been sent. The default 2-second delay is ideal in most cases.
If you normally receive "stacked" pages for 2 or more departments at a time, a setting of 3 Seconds may be best.
Auto-extend recording on late tones - When enabled, this setting will cause the recorder to continue beyond the preset Record Time setting whenever another tone page is detected while already recording.
Logs/Recordings Folder - To change the location where alert logs and audio recordings are stored, un-check Log Alerts then check it again. This will bring up the open file dialog.
5. Server Settings
Click the Server tab to access these settings.
5.1 Credentials - The top section contains User Name, Password and Computer ID. These credentials are provided after you register for an account at www.SafAlert.com. The software will not function without a connection to the SafAlert Server.
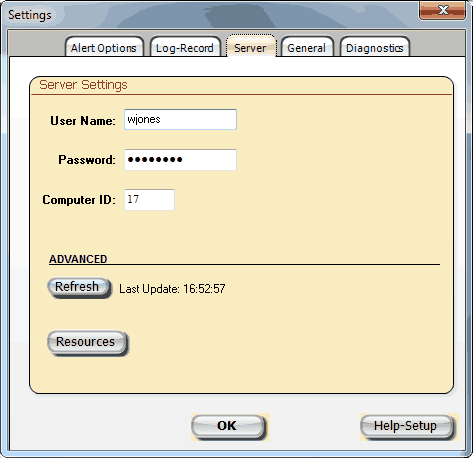
5.2 ADVANCED settings (lower panel)
Update - Clicking this button will cause SafAlert to check the server for any updates to the channel and tone settings.
Resources- These are the predifined server URI's and must not be changed unless directed by a Support Technician.
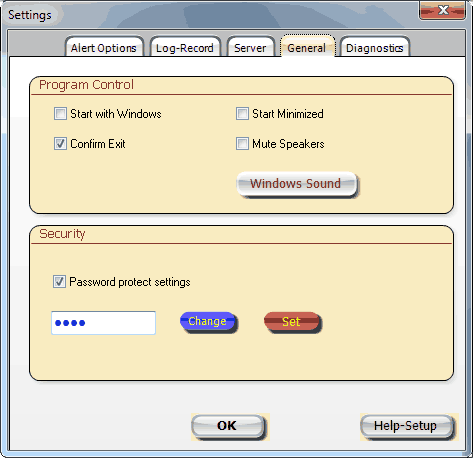
6. General Settings
6.1 Program Control - various program behavior settings
Start with Windows - Loads SafAlert automatically when computer is booted.
Confirm Exit - If enabled, this option will cause a dialog box to open when exiting the program asking you to confirm. This can help prevent a user from stopping SafAlert accidentally.
Start Minimized - Causes SafAlert to launch in minimized state. When SafAlert is minimized, only the tray icon
will remain visible in the lower right-hand corner of the Windows Desktop.
Mute Speakers - Keeps computer speakers muted until an alert is received, depending on Alert Options unMute setting.
6.2 Security - When this box is checked, a password will be required to access the Preferences window.
Enter your password carefully and keep it in a safe place. Password reset requires contacting Tech Support...
Click the Change button. Enter password in the text box, then click the Set button. Password is case sensitive. The default password is "test"
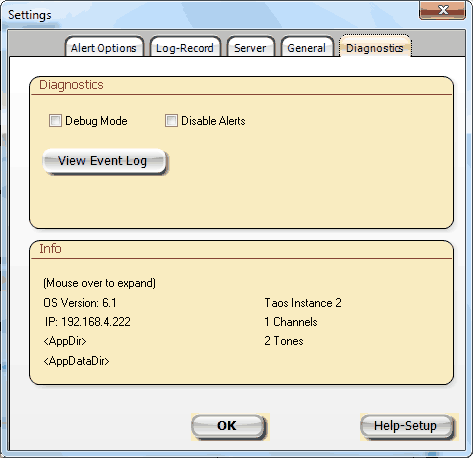
7. Diagnostics
7.1 Diagnostics
Debug Mode - Enable this checkbox to log email activity for troubleshooting. File name is "smtp.log", found in the program folder and may be viewed with Notepad or any text viewer/editor. Note this file can become very large if left active for a long time. For this reason, the SMTP Logging defaults to "OFF" when starting SafAlert. For more info, see the Troubleshooting FAQ.
Disable Alerts - If checked, this will disable sending of any alerts. Do not use unless directed by a Support Technician during
View Event Log - Click to view the system event log when troubleshooting.
7.2 Info - Additional information is provided for convenience in the lower panel of the Diagnostics window.
First is the Windows OS Version. Below, is the computer's local IP address. Mouse over <AppDir> or <AppDataDir> to reveal file locations for the application and data folders. Tone-out and Email Lists are contained in the AppDataDir and program log files are stored in the AppDir. Logs and audio recordings are saved in the folder shown on the Alert Options tab. For more about files see Appendix C.
On the right-hand side, Client Computer Name, number of Channels and Number of Tones will be displayed when connected to the server.
Congratulations! You should now be ready to start using SafAlert. Testing is highly recommended. This may require asking your dispatcher to transmit one or more test pages to ensure everything is working properly and all intended recipients are able to receive their alert messages.
Next section: Using SafAlert
Disclaimer:
Actual performance may vary between different computers and sound cards. The author makes no warranties or guarantees of performance or suitability for any particular purpose, and assumes no liability whatsoever for the use or misuse of any software products. This product is not intended for use as a primary means of notification. The author cannot guarantee timely message delivery and has no control over the Internet, third-party mail servers, or carrier networks.