SafAlert Client

SECTION VI. Using the SafAlert Client
Ver. 4
CONTENTS
- Running SafAlert Client
- SafAlert Console Screen
- Preferences (Settings)
- Windows Playback Volume Control
- Windows Recording Control
1. Running SafAlert Client
![]()
If you haven't yet done so, register for a new account at www.SafAlert.com, then install the software. Once SafAlert has been successfully installed, you may simply double-click the SafAlert Client desktop icon or Click the Windows Start menu, then Programs, choose the ComTekk folder, then SafAlert.
Continue on to Section 2 below for detailed description of the buttons and screens.
2. The SafAlert Client Console

The main console screen consists of four panels, Control Panel, Alerts, and Decoder Channels plus the Main Menu and Status Bar at the bottom of the window. All controls are operated using a single click of the left mouse button unless otherwise indicated.
2.1 Control Panel - This panel contains the most-used controls and indicators.
Mute button - This will simply mute the receiver audio so it is not heard through the computer speakers. If you prefer to hear all radio traffic on the receiver, leave unMuted.
Reset button - After an alert activation, this will silence the local audio/visual alarm as configured in Alert Options. Clicking Reset will not stop or prevent alert messagess from being sent.
System Status indicators - Four lighted indicators give a real-time status of each major sub-system:
Internet - Indicates computer is connected to the Internet.
Server - Green when connected. Red indicates not logged in or was not able to connect.
Channels - Green when channels have been loaded
Tones - Green when tones have been loaded
Legend OFF / Disabled ON / Enabled / Ok Warning Error Condition Busy, working
2.2 Alerts pane - Shows Name, date & time of the 10 most recent alerts.
Click to highlight.
Use mouse wheel or arrow keys to scroll.
2.3 Decoder Channels - There will be one Decoder Channel for each radio connected to the computer. For example, if your department dispatches on two different radio frequencies, you will need to radio receivers and two Decoder Channels.
Audio Level Meter - located on the far left side of the Decoder panel, this indicates the relative audio input volume for that channel. If volume is too high, the OVERLOAD indicator will appear.
Decoder status - Gray when there is no audio present, Green when audio is detected above Squelch level.
Recorder status - Red when recording, gray when in standby mode.
Setup - Click to open Decoder Settings window.
2.4 Main Menu
File->
Alert Test - Click to see/hear a simulated alert based on your chosen local alert settings
Disconnect - Disconnects from server. This will disable alert notifications. Click Logon to re-connect.
Exit - Shut down and exit SafAlert. A YES/NO confirmation dialog will appear if enabled in General Settings.
Settings->
Opens the SafAlert Settings window. Requires password if Security password is enabled.
Logon->
Opens the system login dialog. User name, password and Computer ID must be entered. These credentials are provided after registering for a new account at www.SafAlert.com.
Help->
Help Contents - opens the SafAlert user manual [this file] in your default HTML viewer or Internet browser (Shortcut: F1 key)
Web Site - Opens SafAlert.com in your default Internet browser.
Support - Opens the SafAlert.com Support page in your default Internet browser.
About - Displays information about this software
2.4 Status Bar - Located at the very bottom of the main window, provides another layer of real-time status information.
Indicates application status with additional details, such as error conditions, etc.
2.6 System Tray Icon - When SafAlert is minimized, only the tray icon
will remain visible in the lower right-hand corner of the Windows Desktop. Click the icon to show the console window. Right-click the icon to show the popup menu with options About, Restore, Setup, Exit.
3. System Settings Window
To access the settings screen :
From the Main Menu, click Settings.
Click here for help on Settings.
4. Windows Playback Control
This section is provided as a reference - it should not be necessary to adjust the Playback settings for proper operation of SafAlert.
Windows Volume Control (Output):
This screen controls the sound card OUTPUTS and will have no effect on the decoder, since it uses the sound card INPUTS, which are controlled by the Recording Control (see next section below).
Windows playback [output] settings, accessible from Windows Control Panel

Click "Properties" then select the "Levels" tab for playback mixer controls. Again, these controls will have NO effect on the decoder's operation:

5. Windows Recording Control
These settings affect sound device INPUTS, such as LINE , AUX, Wave, or Microphone.
To access Recording controls, click the Windows Sound button in the Decoder Settings window, or right-click on the speaker icon in your system tray. Select "Recording devices" from the popup menu.
In the example below "Line In" is selected and is the default recording device as indicated by a green checkmark:
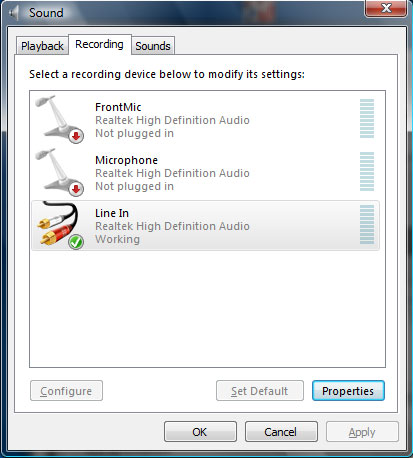
Click Properties then select the Levels tab for Line In level control. This sets the audio level sent to the Decoder.
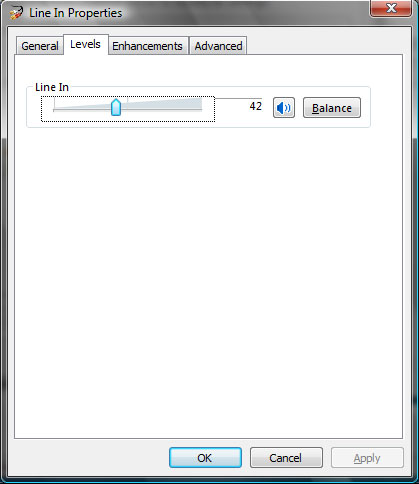
Additionally, the program may be given exclusive control of the selected device by checking the box below. This prevents the user from accidentally changing settings for this device. While not required, this option may be helpful in some cases.

Disclaimer:
Actual performance may vary between different computers and sound cards. The author makes no warranties or guarantees of performance or suitability for any particular purpose, and assumes no liability whatsoever for the use or misuse of any software products. This product is not intended for use as a primary means of notification. The author cannot guarantee timely message delivery and has no control over the Internet, third-party mail servers, or mobile carrier networks.